Thursday, 22 May 2014

Covering Up


The pile of wood under the light blue tarp is a complete frame for my temporary roof. Today is the day to put it up and get the site under cover.


First job was to clear the floor for the scaffolding tower that needed to roam about inside. The eight pillars are leaning on the fixed scaffold like drunkards, and the remaining timbers have been stacked all around it.


These pillars are pretty wobbly by themselves. They are designed to fit along the walls and in the corners, so they do not have all-round supporting bases.


The first rafter goes on, propped with a piece of 3x2. Hope there isn't a sudden gust of wind........


It's 11 o'clock. All four rafters in place. The two at the ends are propped, the middle pair are stable enough to stand up by themselves - as long as I don't get a domino-style collapse. 


1.30. I have spent the second half of the morning putting in horizontal and diagonal bracing. All feeling much more stable. I've made a box, about the size of the building I'm planning to make - but in a morning!


Afternoon: I am adding some battens to make a very lightweight deck to support the tarp. I'm using 22 x 50mm battens set on edge and nailed to the rafters.


4.30: Roof deck complete.

I unfolded a 7 x 9 metre tarp on the deck at around 5.00 this afternoon,  and encountered my first real problem. Some of the eyelets on the tarp were missing. On inspection I found that ALL the eyelets were unpressed; they could be flicked out with a fingernail. Completely useless!


Luckily, I had just the tool for the job. When I modified a tarp for the dome or bale shelter, I bought a eyelet stamp and dye. I had to go round the edge of my new tarp and stamp every one of the 64 eyelets. In situ, on the roof. In a strong wind.


So it was about 7.00 when I finished. But it's quite an impressive structure to have built in a day, without help. It looks like my building is already there! Though the truth is, this is all temporary, and if everything goes to plan, I should be taking it down again in about 4 - 6 weeks to reveal a straw building within.

Friday, 9 May 2014

Straw!

It's the beginning of May, and only a couple of weeks until we build up the walls with straw bales. So how are things going?

The big news this week is that the straw has arrived. I ordered my bales way back in August last year at harvest time, and they have been in storage since then. And now, here they are:


Nice as it would have been to buy my bales from the farm down the road, I decided that I would search out the very best bales that I could buy. The price, including storage and delivery, was around five times what I would have paid for local bales, but they are very firm, very square, and a regular length. And although the focus is very much on the straw used in construction, the cost of bales is a very small fraction of the total cost of this building and it doesn't make sense to compromise.

Slight snag is: the bales are in large packs with 21 bales to a pack and they need a forklift truck or telehandler to unload them. And even if I had one, I couldn't take it up my garden to the bale store and build site. But help is at hand from the lovely couple in a farm (the one at the end of the road.) With a JCB telehandler, it's just a 15 minute job to get them all into his barn. I've bought 6 packs, 126 bales.


Then it's 7 trips down the road and up the garden with the trailer to get them under cover in my bale store.


Floor lined with pallets to keep them off the ground


The stack takes shape, about 40 bales here.


And yes! - they all fit in. Hard to take a photo of, but I think you can see there is still space to spare. The bales on the right in this photo are not going to be used in construction. I have six bales left over from the slab insulation that I used over the winter which I have kept for sitting on. Compared to the bales just delivered they are a bit soft and fluffy. Also damp, because they got left outside for a couple of nights


Scaffolding


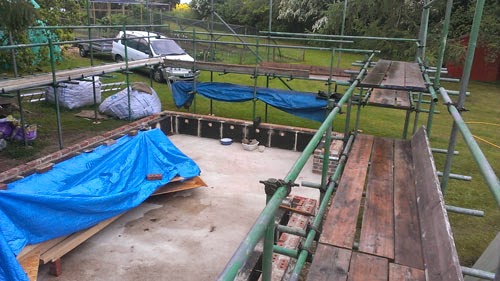
Other recent work has been to get the building scaffolded. Another straw bale builder has very kindly lent me a couple of tons of scaffolding for the summer, and I have constructed a deck all the way round at about 1.5 metres height. This is a bit of a compromise: the ideal height for work at eaves and roof level might have been 1.0 to 1.2 metres, but that would have been uncomfortable low for working on the lower part of the outside walls.


Temporary Roof


I am providing weather protection over the building while the straw walls are going up. I've been on straw builds before where there is a mad scramble every time the rain starts, and it can be very disruptive. I don't want to have volunteer builders here who have given their time to come and help sitting around waiting for the weather to improve. So I've made 8 of these pillars, and I will construct a lightweight roof of rafters and battens, brace the structure and cover with a tarp. I'll also have curtainsides of tarp all the way round which can be lifted and stored on the roof while we are working, and dropped if it rains.


It's a work in progress. I designed the temporary roof before I knew I had the scaffolding, so it might take a little modification to get them to fit together.


Saturday, 12 April 2014

The Stem Wall


March 31st to April 4th

After a long winter layoff, building has started on my site again, taking advantage of some warm March / April weather. There has been much planning, preparing and purchasing of supplies, but now it's back to building.

One of my purchases is a forced-action mixer from ebay, and it has had its first outing this week:


It's great for mortar, and I'm sure it will be for plaster, but needs a different set of paddles for mixing limecrete, apparently. It has a "Kenwood Chef" mixing action, rather than the normal "Tumble drier" method. It's also a bit of a beast to clean

I am building a stem wall for the bales to sit on, and it will be a wide cavity wall 450mm thick. I am hoping to obtain foamglass blocks for the inner skin, but haven't been able to get my hands on them yet, so I may have to compromise on lightweight concrete blocks. The outer skin will be a mixture of leftover engineering bricks, recycled brick from a garden wall I knocked down last year and flint infil. 

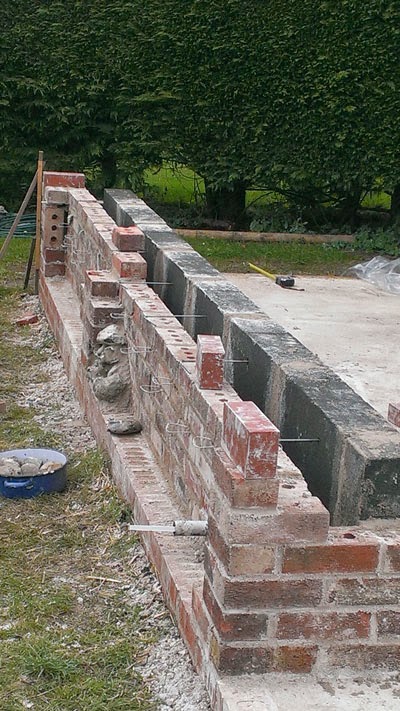
We've been building the corners and the ashlar pillars. Only two of the four walls will contain a flint face, so this is the simple, single-skin brick corner:


This is the doorway in the front wall, showing the ashlar in greyish bricks front, left, and the backing wall for flint in red engineering bricks.


Also, above, you can see a bit of black plastic pipe built into the wall. This will be used much later for compressing the straw with lorry ratchet straps. There will be about 15 of these built in around the stem wall.

It's coming along. Once we have the corners and ashlar finished, the remaining wall sections should go up much more quickly.


April 7th - 11th.

Good news this week: I have taken delivery of some foamglass blocks for the inner skin of the stem wall. They are very lightweight, much less dense than the foamglass gravel in the base.

I was working by myself on Tuesday, and got the remaining corner and ashlar pier finished. (If you're not familiar with the term "Ashlar" - I only heard it a couple of years ago - it's the  brickwork surrounding flint panels in Norfolk flint walls.)

But on Wednesday, I was joined by Guy, my first POOSH volunteer, and the walls have been going up much more quickly. This is partly because there are two of us, but also because we've been working all day, every day. When you are just working by yourself, it's easy to get distracted.

So, here's the front wall:


The 450mm width is made up of 4 components, which from left to right are: 1) Flint panels and ashlar (brick borders). We are going to do these last, but there are a few flints in the far bottom corner of the first panel, where we had some mortar to use up. 2) Support wall for flint made of recycled brick, lime mortar and containing some butterfly cavity wall tiles, which are supporting the flints not for bridging the cavity. 3) Cavity, approx 100mm. 4) Recycled foamglass blocks, 140mm x 450mm x 600mm laid on edge. 

Only two walls are to be faced with flint. On the other walls, the brick will be the outer skin and the cavity will be around 210mm. Also visible in photograph: service pipe for electricity cable, and stainless steel, long wall ties connecting RFG blocks and brick/flint walls.

There's been a change of plan for compressing the straw walls. The RFG blocks looked like they would not support the pressure from lorry ratchet straps, so I am going to put plastic pipe in the top of the wall, so that the compression force will bear directly on the timber base plate. 


Guy, No. 1 bricklayer, at work. There are, of course, not many photos of me at work, as I am usually the photographer.

Here's my delivery method for large and heavy bags of materials, in this case foamglass gravel


1) Get delivery driver to drop bags onto my trailer
2) Drive up garden to where they are needed
3) Tie bags one at a time to tree
4) Drive away with trailer, depositing bags on ground

This foamglass is going to be used to fill the cavity in the stem wall.

April 14th - 18th

I have discovered that you get a lot more work done when someone is helping with a job, especially a job like bricklaying. More than twice as much. Firstly, there's the social pressure of Working All Day; it's much harder to start late or knock off early if there's someone else around who has come to visit specifically to help with the building. But secondly, there are "overheads" in any job - tasks that must be done, but which are not visibly productive: setting out, measuring lime and sand, cleaning the mixer. These take up a smaller part of the day when they are supporting two hands rather than a sole builder.

So, building work has been full time this week, four days of brick (and flint) laying, and one trip out in a hired truck to pick up some scaffolding on loan. As a result the plinth wall is very nearly finished, and the scaffolding is part-erected.

Starting to lay flints whilst Guy completes the brick outer wall.

Last brick!
Thursday night: All bricks and RFG blocks laid
Friday night: The almost-completed plinth wall. Just a few flints to lay on the left of picture

It would have been nice to get finished, but I ran out of lime. No worries - we're still on schedule.
Sunday, 30 March 2014

More Preparation. Wood, Ashlar & Cutting Corners

March 30th. I've been getting ready to build in lots of areas.

The cover has come off the limecrete slab and around 20 bales of damp straw fluff removed. All looks OK underneath


I found a source of "SmartPly" OSB, reckoned to be preferable to the standard grade on account of the lower formaldehyde content (Meyer Ltd). I have 16 sheets in the dome for cutting, and 20 under cover for use as the roof deck later.

Cutting corners!

But not in the metaphorical sense. I have been very carefully cutting out square corners from SmartPly sheets to form the corners of the wall plate. Eight of these:


And quite a lot of these straight section, all 450mm wide


It's been very useful having plenty of trestles to support sheets whilst cutting. I made 6 of these from scrap wood during the winter.


Lots of wood arriving: - 


It was a day's work to get the wood up the garden near the site and under cover. Quite a big pile outside......


......and plenty more inside:


Also taking up a lot of time over the last couple of weeks has been the brickwork layout for the stem wall. My layout for the limecrete base last year was not very good, producing a not entirely rectangular base. The diagonals are out by 8cm. I have put up new corner guides for the stem wall that are rectangular, but as a result of the earlier error, they don't sit exactly over the base. I have decided that in the long run, this will be better than having the whole building out. I will have to cover up the foot of the stem wall with plants so it doesn't look too odd; it's a 2cm underhang or overhang at the corners.

I've also been doing detailed planning of the ashlar - the brick corners and pillars that are used in flint walls. 


I've built each one up with dry bricks, photographed it course by course, and produced a plan 

I felt the need to do this because it gives me one thing less to think about when I am laying the bricks.


Saturday, 15 March 2014

Completing the Bale Shelter

March 15th. Today is the official start of the building season. It's still a little early for any lime-based bricklaying, but time to get on with some carpentry.


And before I do any large-scale carpentry I am going to need an outdoor store. Time to get my giant tarp out and cover the new dome.

I was going to do this job today, Saturday, but the forecast was a little breezy and I didn't fancy handling 100 sq metres of tarpaulin balanced on a ladder.  But a couple of days ago the forecast was just perfect:


Practically the whole UK was isobar-free. It was a cold night, a foggy morning and then warm sunshine without a breath of wind


The tarp measures 12m x 8m and the dome has a diameter of 7 metres and a height of 3.5m.  I've prepared the tarp with some extra eyelets along one of its long edges. So: chuck it over, and  get the mid-point of the prepared long edge lined up on the large base triangle that I have in mind for the entrance.


Lace up the edge to the struts with shock cord


Tie a couple of bricks on the opposite edge to keep the midline of the tarp under tension,


Work round the base of the dome, tucking the tarp under the bottom struts


Roll up the tarp to make it look a bit tidier; tack down some geotex fabric over the hubs to give the tarp some protection from the edges.


That's it! I've also put some ground pegs along the base, and four stakes inside with tie-downs on the hubs. It's flapping a bit in the breeze today (Saturday) so I plan to make a web or net to go over the top tomorrow, and keep the folds in place.

Thursday, 13 February 2014

Information for Volunteers wanting to help with this building project

This post contains information for anyone who wishes to help out with this project on a voluntary basis. It's intended to be supplementary information for "POOSHers"  - sustainable builders and others interested in the subject who are registered with POOSH at www.thepoosh.org. If you haven't come across POOSH before, you should check it out right now. It's just like WWOOF, but for sustainable building, and puts volunteer helpers in touch with host projects.

I intend to restart work on this project on March 15th and I'm posting a timetable below of the types of work that will be going on this year. I will try and keep the timetable up-to-date with changes that arise from the building progress or for any other reasons.


Dates: ( working on most days during the period)
Type of work
Number of POOSHers needed,
March 15  - March 29
Carpentry:  cutting and part-assembling baseplate, wallplate, window boxes temporary roof .
Put cover on bale shelter
1 - 2
April 7 – May 8
Bricklaying: Constructing stem wall with recycled brick, flint and lime mortar.
Carpentry: completing temporary propped roof
Straw delivery
Prepare hazel pins
Scaffolding
1 - 4
May 26 – June 8
Wall-raising (bales)
Wallplate assembled
Wall compression
4 - 8
June 9 – June 23
Get the roof on!
1 - 4
July 1 – 20
Overrun period
??
July 29 – Aug 12
Lime Plastering
1 – 8
Aug 26 – Sep 30
Lime & Clay plastering
1 - 8

Calendar View:


The normal pattern of work will be to do some building on 4 weekdays and Saturdays during the highlighted periods above, and to have Sunday and one weekday off. Maybe.

If you would like to come and lend a hand over the summer, please get in touch now via the POOSH network. My project is listed there at http://thepoosh.org/buildproject/richard-roberts/strawbale-workshop, and it is currently the only project in North Norfolk listed on the POOSH project map. (Please do NOT contact me via this blog; I may not see your message.)