March 31st to April 4th
After a long winter layoff, building has started on my site again, taking advantage of some warm March / April weather. There has been much planning, preparing and purchasing of supplies, but now it's back to building.
One of my purchases is a forced-action mixer from ebay, and it has had its first outing this week:
It's great for mortar, and I'm sure it will be for plaster, but needs a different set of paddles for mixing limecrete, apparently. It has a "Kenwood Chef" mixing action, rather than the normal "Tumble drier" method. It's also a bit of a beast to clean
I am building a stem wall for the bales to sit on, and it will be a wide cavity wall 450mm thick. I am hoping to obtain foamglass blocks for the inner skin, but haven't been able to get my hands on them yet, so I may have to compromise on lightweight concrete blocks. The outer skin will be a mixture of leftover engineering bricks, recycled brick from a garden wall I knocked down last year and flint infil.
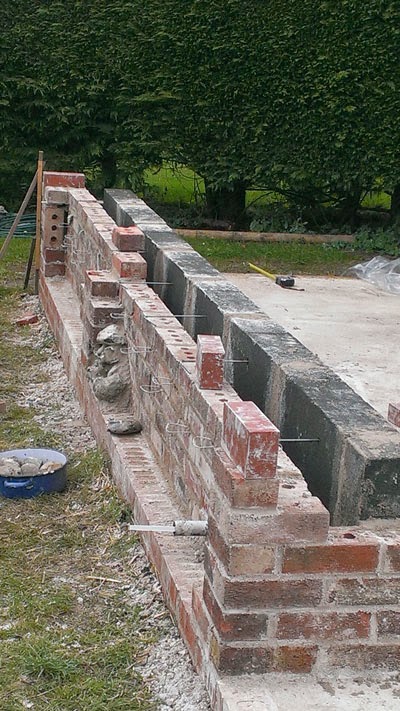
We've been building the corners and the ashlar pillars. Only two of the four walls will contain a flint face, so this is the simple, single-skin brick corner:
This is the doorway in the front wall, showing the ashlar in greyish bricks front, left, and the backing wall for flint in red engineering bricks.
Also, above, you can see a bit of black plastic pipe built into the wall. This will be used much later for compressing the straw with lorry ratchet straps. There will be about 15 of these built in around the stem wall.
It's coming along. Once we have the corners and ashlar finished, the remaining wall sections should go up much more quickly.
April 7th - 11th.
Good news this week: I have taken delivery of some foamglass blocks for the inner skin of the stem wall. They are very lightweight, much less dense than the foamglass gravel in the base.
I was working by myself on Tuesday, and got the remaining corner and ashlar pier finished. (If you're not familiar with the term "Ashlar" - I only heard it a couple of years ago - it's the brickwork surrounding flint panels in Norfolk flint walls.)
But on Wednesday, I was joined by Guy, my first POOSH volunteer, and the walls have been going up much more quickly. This is partly because there are two of us, but also because we've been working all day, every day. When you are just working by yourself, it's easy to get distracted.
So, here's the front wall:
The 450mm width is made up of 4 components, which from left to right are: 1) Flint panels and ashlar (brick borders). We are going to do these last, but there are a few flints in the far bottom corner of the first panel, where we had some mortar to use up. 2) Support wall for flint made of recycled brick, lime mortar and containing some butterfly cavity wall tiles, which are supporting the flints not for bridging the cavity. 3) Cavity, approx 100mm. 4) Recycled foamglass blocks, 140mm x 450mm x 600mm laid on edge.
Only two walls are to be faced with flint. On the other walls, the brick will be the outer skin and the cavity will be around 210mm. Also visible in photograph: service pipe for electricity cable, and stainless steel, long wall ties connecting RFG blocks and brick/flint walls.
There's been a change of plan for compressing the straw walls. The RFG blocks looked like they would not support the pressure from lorry ratchet straps, so I am going to put plastic pipe in the top of the wall, so that the compression force will bear directly on the timber base plate.
Guy, No. 1 bricklayer, at work. There are, of course, not many photos of me at work, as I am usually the photographer.
Here's my delivery method for large and heavy bags of materials, in this case foamglass gravel
1) Get delivery driver to drop bags onto my trailer
2) Drive up garden to where they are needed
3) Tie bags one at a time to tree
4) Drive away with trailer, depositing bags on ground
This foamglass is going to be used to fill the cavity in the stem wall.
April 14th - 18th
I have discovered that you get a lot more work done when someone is helping with a job, especially a job like bricklaying. More than twice as much. Firstly, there's the social pressure of Working All Day; it's much harder to start late or knock off early if there's someone else around who has come to visit specifically to help with the building. But secondly, there are "overheads" in any job - tasks that must be done, but which are not visibly productive: setting out, measuring lime and sand, cleaning the mixer. These take up a smaller part of the day when they are supporting two hands rather than a sole builder.
So, building work has been full time this week, four days of brick (and flint) laying, and one trip out in a hired truck to pick up some scaffolding on loan. As a result the plinth wall is very nearly finished, and the scaffolding is part-erected.
 |
| Starting to lay flints whilst Guy completes the brick outer wall. |
 |
| Last brick! |
 |
| Thursday night: All bricks and RFG blocks laid |
 |
| Friday night: The almost-completed plinth wall. Just a few flints to lay on the left of picture |
It would have been nice to get finished, but I ran out of lime. No worries - we're still on schedule.


No comments:
Post a Comment