Day 1: I have two resident volunteers and five who have come for the day. Three of the seven are long-standing friends; two I have met through the POOSH network, and two I have met through other networks.
It's warm and sunny. Perfect weather for straw bale work. And the jobs lined up are: finish filling the wall cavity with RFG gravel; start making the base plate; make some hazel stubbies and finish putting up the tarps as curtains around the building.
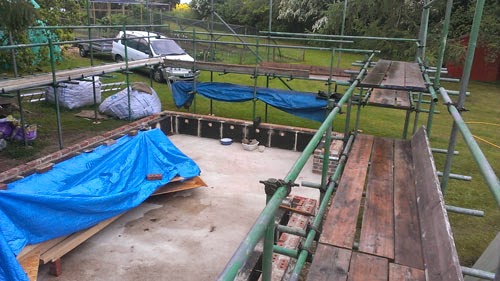
But: there is a design issue to sort out first: how long are my bales? I have designed the entire building with the assumption that the bales I use will have an average length of 1050mm. The very first job of the day, before we start making the base plate, is to dress a few bales, lay them along the stem wall and measure them.


This didn't take too long with eight people. Also, the bales have very square ends already. I think it must be to do with the mechanical strapping, handling and storage of the bales, but they needed much less dressing than bales I have handled before

We laid eight bales along the stem wall and measured them: 7980mm, an average length of just under a metre. This meant that my longest wall of 8.4 metres was going to be closer to 8.5 bales than the original 8 bales I had planned. Time to get out the revised bale plan and elevation, now 5 x 8.5 bales rather than the original 4.5 x 8. It's a bit of a problem: all my openings are multiples of 1050mm, so I can foresee quite a lot of bale splitting coming up. I will also need around 10 more bales than originally planned.
Luckily, I bought some extra bales. Unluckily, or carelessly, I have already got some of them wet. It turns out that the green tarp on the dome is only waterproof for a few weeks, then it start letting water in. I have eight bales already with damp patches.
Lunch outside. Hats & suncream needed.

Then it was on with the base plate:


Making stubbies in Bodger's Corner:

Putting the curtain sides of tarp around the building. My tarp supplier had to supply stripy market stall tarp instead of white. Luckily, I chose white with red stripes:


So they are nicely colour-co-ordinated with the old cargo netting that one of my friends has kindly lent me. It looks like I'm opening a circus! As usual, there are no photographs of the afternoon-long struggle to get the tarps up, because I was the one struggling with them.
Tea break in bodger's corner:


Thanks to everyone who contributed to a great first day. We have most of the stubbies, a half-constructed base plate, a few dressed bales and the south and west sides of the building protected from rain. Unless we had the unlikely combination of heavy rainfall and a north-easterly wind, we should be able to keep the site dry.
Day 2: We woke on Tuesday to heavy rainfall, blown in on a brisk north-easterly wind. This was probably the wettest day for several years in this area. There were flash floods in many residential streets in Norwich. Water poured in through the exposed eastern side of the shelter whilst I fought with tarpaulin sheets outside. The tarpaulin roof started to dish with pools of water in between the horizontal lathes. It wasn't like Monday, and there aren't many photos of happy smiling POOSHers.
There were in fact no POOSHers today, but two volunteers from other connections.


Great work from Mary and Katy in terrible conditions. By the end of the day, the sections of the baseplate were complete,


I spent most of the day trying to keep the water out.
Day 3: POOShers = 2, friends = 1, other connections = 1. Weather: cloudy and damp, rain in the afternoon.
It was outdoor weather in the morning, and I had two new volunteers, so we spent a little time in bodger's corner sorting and shaping the hazel. In the afternoon, Owen and Oskar assembled the large window box, whilst Paul and I worked on completing the baseplate


I believe this is old-school window method for straw bale building, but my straw bale education does not include the post method, and I don't have the tools for making slots for window posts in my bales. It's a bit of a monster: a heavy lift for two people, probably better with four.

Day 4. POOSHers = 1, friends = 1. Weather: light rain, overcast.
I found two buckets in the garden this morning, both with around 3 inches of water in. I'm fairly sure they were both dry buckets on Monday, and that all the water in them has fallen as rain since then. In this area, three inches of rain represents about one tenth of a year's average rainfall, so I think it would be fair to say that I have not been very lucky with the weather in my chosen "Build" week.
So another indoor day, but not wasted. We have finished preparing the hazel:
Stubbies: (300mm, press fit in a 32mm noggin hole)


Withies: (900mm, overall thickness less than 25mm)

And long stakes: (1350mm, any diameter)

I may have just made up some of these names. We have made 50 of each. There may be a few more needed for the window boxes

Paul has been shovelling the RFG into the cavity. I had originally planned to place sheepwool insulation in the baseplate, but I have a surplus of RFG so it seems logical to keep filling the cavity up to the top of the baseplate.
Here's a photo of rainwater on a tarpaulin. The reason I include it is that this photo is taken inside my dome straw shelter. The rain is seeping through the outer dome cover, and would be soaking my straw if I hadn't put another tarp or two inside. For the record, the dome cover is a Tarpaflex "Super Tarpaflex" mid-grade 140 gsm 8 x 12 metre tarp. Don't waste your money on one of these!

What else? I've made corner guides for all the corners, all beautifully plumb and square, I hope:

And I've had a big tidy up, and made a new tool station that takes up a minimum of space in the tent:

There is no more carpentry to do. Tomorrow, it's straw wall-raising.
Day 5; Sunshine! And no rain. 1 POOSHer.
So: Curtain up! I suppose it would be possible to raise the walls with the side tarps down, but I prefer to have the sides open when I'm building. We have laid some bales along the plinth wall. They are not in their final positions yet, we are just sizing them up.

Straw bales do not come in standard lengths. In fact, there will be some variation in bale lengths from any baling machine. We have discovered that eight bales (and one crossways at the corner) will be a good fit on the long back wall, but that the two short and two part-walls will all most likely require a bale to be resized to fit. Bale resizing takes two people around 15 to 20 minutes per bale, and requires concentration and strong hands, so the poor estimate of actual bale size is going to cause quite a lot of extra work.

Hazel stubbies fitted to the baseplate. we are going to lower the bales onto the stubbies so that they can't move sideways. There will be 23 bales in the first course, and we've got 46 stubbies ready

and here goes the first bale.

Some of the stubbies are a little loose, and require a few hazel chips to be hammered in to wedge them.


And we got about 2/3rds of the first course of bales in position before Paul had to leave. Two bales were successfully shortened, although not always at the first attempt.
Positioning bales over hazel spikes and forcing them down is not a job to try and do solo, so once Paul left I concentrated on getting the tarp sides back in position, moving more bales down from the store and tidying up. I'll be building again once I have some volunteer help - hopefully on Monday or Tuesday next week